Pages

Wednesday, September 28, 2011

German Chocolate Cake with Pecan Filling

Last week, we celebrated hubby's birthday! He is a chocolate fan and LOVES German Chocolate Cake!!! I knew I wanted to create a healthy but delicious cake for him so that it would stick with his new crossfit challenge. 

HERE IS WHAT I CAME UP WITH!!!! :) 

German Chocolate Cake Revised
¾ cup 
coconut flour, sifted
½ cup 
cacao powder
1 teaspoon 
celtic sea salt
1 teaspoon baking soda
10 eggs
1 cup 
grapeseed oil
Date mixture (5 dates, pitted, splash of vanilla, water)
1 tablespoon 
vanilla extract
  1. In a small bowl, combine flour, cacao, salt and baking soda
  2. In a large bowl, using an electric hand mixer, blend eggs, oil and vanilla
  3. In a small dish, add 5 dates, pitted, a splash of vanilla and water. Put in the microwave for 30 seconds and take out. Mash with a fork. If it needs to be softened more add back in the microwave for another 30 seconds. You want this mixture to be pure mush! 
  4. Add date mixture to wet ingredients. 
  5. Add dry ingredients into large bowl and continue to blend
  6. Oil (2) 9 inch round cake pans and dust with coconut flour
  7. Pour batter into pans and bake at 350° for 35-45 minutes
  8. Remove from oven, allow to cool completely then remove from pans

Coconut Pecan Filling
1 cup 
coconut milk (canned)
1 cup maple syrup

pinch 
celtic sea salt
5 teaspoons 
arrowroot powder
1 tablespoon water
1 ¼ cup 
coconut oil
1 ½ cups 
unsweetened shredded coconut
1 ½ cups pecans, toasted and chopped

  1. In a medium saucepan, heat coconut milk, maple syrup and salt, simmer for 10 minutes
  2. In a small bowl, combine arrowroot and water to form a smooth paste
  3. Pour arrowroot mixture into saucepan
  4. Whisk the contents of saucepan vigorously and bring to a boil, briefly
  5. Remove pot from heat and very gradually blend in coconut oil
  6. Place pot in freezer for 30-40 minutes, until frosting solidifies and turns white
  7. Remove from freezer and blend again, until fluffy, then stir in shredded coconut and pecans
  8. Spread frosting over cake and serve

Vegan Chocolate Frosting
1 cup 
dark chocolate chips
½ cup grapeseed oil
2 tablespoons maple syrup
1 tablespoon vanilla extract
pinch celtic sea salt

  1. In a small saucepan over very low heat, melt chocolate and grapeseed oil
  2. Stir in agave, vanilla and salt
  3. Place frosting in freezer for 15 minutes to cool
  4. Remove from freezer and whip frosting with a hand blender until it is thick and fluffy

Assembly
1.  After the cakes have cooled completely, remove them from the pans and place one on a pretty serving plate or platter
2.  Spread the Coconut Pecan Filling on top of the first layer cake
3.  Place the second cake on top of the first
4.  Spread the top and sides of the cake with Chocolate Frosting
5.  Cover the top of the cake with Pecan Coconut Filling
6.  Serve

Tuesday, September 27, 2011

Mexican Pulled Chicken stuffed peppers

I am on a SPICY Mexican kick!!!! I do not know why I do it to myself but I end up with heartburn EVERY TIME but it is so good while I am eating it!!! :) Which I think that is all that matters!!!! 

Baby was craving more spicy and I had peppers that needed to be used. I decided to make chicken stuffed peppers, Mexican style!!! They were sooooo good!!!!
The Ingredients:
3 Medium/Large Bell Peppers (any color will do!) , cut in half
3 - 4 chicken breasts
1 can Tomato and Chili's
1/2 bell pepper, diced, use one of the halves 
1/2 onion, diced
taco season - 1 tsp salt, 2 tsp onion powder, 1 tsp chili powder, 1/2 tsp crushed red pepper, 1/2 tsp garlic powder, 1/4 tsp oregano, 1 tsp ground cumin


The Directions:
In a frying pan add chicken, can of tomatoes and chili's, 1/2 bell pepper, 1/2 onion, and taco seasoning. Mix everything together and let the chicken cook on medium/medium high. I added just a little bit of water to help mix in the taco seasoning. As soon as the chicken is cooked all the way through, shred the chicken and add back to the mixture. Scoop the mixture into the 5 bell pepper halves. Top with cheese, if you do dairy. Bake at 350 degrees for 20 minutes. Once the peppers are out add a dollop of salsa on top of the cheese. 


We served our peppers with avocados!!! Mexican Cauliflower Rice would be awesome with this too!!! 


ENJOY!!!!!


Part of Melt in your mouth Monday, Monday Mania
Hearth-and-soul-hop-with-premeditated-leftovers, Fat Tuesday

Monday, September 26, 2011

Spaghetti Squash Chicken and Broccoli Casserole

When first learning to cook I made a lot of casseroles and seemed to only find new recipes that were casseroles. It was a great experience but it was a lot of processed foods. Now that we are eating healthy and trying not to consume too much (if any) grains and dairy casseroles are pretty much out of the question. At least the ones I was making! 

Every so often I do come up with a quick easy casserole that is healthy and delicious! 

 I made a rue sauce with Coconut Oil, Coconut Flour and Coconut Milk. I seasoned the rue with pepper and basil.

This time I cooked the spaghetti squash with coconut oil and a bay leaf.

I cooked chicken pieces on the stove and mixed with broccoli.

I then mixed everything together and put it in the pan and baked at 350 degrees for 20 minutes.

I did over cook the squash this time but I will not cook the squash as long next time or maybe cook everything less time at the end. It was so delicious!!!

Tuesday, September 20, 2011

Mexican Stuffed Peppers

Before I start, I just want to start off that this is not a PRIMAL or PALEO recipe but a delicious, more healthy splurge dinner recipe!!! We are starting back on a more strict Primal/Paleo diet as my hubby starts doing Crossfit hardcore and training for some competitions.  Last week was our last week of legumes and grains. 

This was such a delicious stuff pepper recipe. Not like the traditional stuff pepper recipe at all!!! My neighbor had made taco soup the night before I made these and the mixture just sounded perfect for my peppers! I had a large amount of peppers from our food share. I might add that the mixture is great alone and freezable. You can also freeze bell peppers and enjoy stuff peppers all year round! 
The Ingredients:
3-5 bell peppers, green or colored, halved, seeds removed

1/2 pound ground beef (or a full pound)
1 Tbs. taco seasoning (or follow package directions for 1/2 pound beef)
1 1/2 c. frozen corn (optional)
2 c. black beans (about 1 can)
1 16 oz. jar salsa
1/4 c. diced red onion
(optional) other vegetables: diced red pepper, zucchini, leafy greens, etc…anything you have on hand to enhance the mixture
(optional) extra kidney beans or lentils to fill in for the missing 1/2 lb. ground beef


The Directions:

Brown meat and add taco seasoning, following directions on packet or with seasoning recipe to make basic taco meat. If using a half pound ground beef, you might brown a whole pound and freeze the other half for an easy pasta meal the next week. Consider adding cooked lentils or kidney beans at this point and double the taco seasoning accordingly.
Add all the other ingredients except the cheese and heat through on the stovetop. Be creative with the vegetables you have on hand; it’s hard to go wrong with a whole jar of salsa and some taco seasoning already in the mix!
Meanwhile, use a steamer basket to steam the halved peppers for 5-10 minutes until somewhat softened but not cooked to death. Arrange in an oval or 9×13 casserole dish and “stuff” the filling into each pepper generously. This filling is a bit like the loaves and fishes: everything is suddenly full and there’s still more left! I often end up with more filling than I need, which becomes great taco style leftovers or freezes well for a future meal.
After filling, top the peppers with shredded cheese and broil or bake at 350F for 5-10 minutes to brown the cheese.


Part of: Hearth and Soul Hop, Pinterest for Traditional Foodists Link-up, Fat Tuesday

Monday, September 19, 2011

Carrot Onion Roast

I am starting to be discouraged this pregnancy. My cooking skills and motivation are LACKING. My creativeness is lacking big time... My belly and hiatal hernia dislike a lot of foods. With that being said it is hard for me to get creative and want to spend a lot of time in the kitchen. 

Friday, I made a new roast. It wasn't totally cooked so we ended up eating it this weekend. The flavor is great and I am trying my hardest to remember exactly what I did!!!! :)  
Since my crockpot broke a few months back, I cooked this roast on the stove top!

The Ingredients:
Onion, sliced
garlic, minced
1 roast with bone in
carrots, cut not peeled
Olive Oil
Garlic
Parsley
Basil
beef broth


The Directions:
Start by adding Olive Oil, Onions and garlic. I only cooked the onions and garlic for a minute or two and then I added the roast and seared both sides of the meat. Add beef broth. Enough to cover the meat and scrap up the brown crisps on the bottom of the pan. Bring broth to a boil and then turn heat down to low. Add seasonings and carrots and cook for 6 hours on low. You may want to check the broth level and add more after a few hours. Right before serving add a splash of balsamic vinegar.

This roast was so yummy!!!! It had an amazing flavor, different from my other roasts!

Part of: Real Food 101, Monday Mania, Homestead Barn Hop

Thursday, September 15, 2011

Tomato and Chili Chicken in the Crock

I love cooking Chicken Fryers in the Crockpot. It is so quick and easy and leave the chicken so tender and full of flavor!
 This time I added the chicken in the crock and poured over 1 can of tomato and chili's. I let the chicken cook on low for 6 hours. The meat just fell apart. The chili's left a MILD kick in the background that was a pleasant surprise but not over powering for the kids.

Wednesday, September 14, 2011

Kale Chips time!

Last week we got some delicious Kale in our CSA food share. I love Kale and I love making Kale Chips!!! They are so delicious and simple to make and full of great vitamins! 


The Ingredients:
Cashew Cheese

1/2c unsalted cashews
1/4c nutritional yeast
1T coconut oil

A bunch of Kale


The Directions:
Wash and Dry Kale. Preheat oven to 170 degrees - or the lowest oven temperature. 

I laid the Kale out on a cookie sheet and spray the Coconut Oil over the Kale. 

In a bowl, I mixed the Cashew Cheese and the sprayed Kale. Coating the Kale with the Cashew Cheese. 

I then poured the Kale back on the cookie sheet and sprinkled the remaining Cashew Cheese on the Kale. Then I sprayed the Kale one more time with the Coconut Oil. 

I did not have a full bunch of Kale. I baked mine at 170 degrees for about 1 1/2 hours. Just watch the Kale until crispy. 

ENJOY!!!

Wednesday, September 7, 2011

Baked Seasoned Chicken and Collard Greens

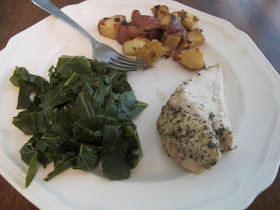
Yesterday I posted a recipe for my yummy Collard Greens. Here is what our dinner looked like! 
Baked Seasoned Chicken @ 350 degrees for 20 minutes. Cooked 3 breasts
Lemon Pepper, Garlic Powder, Herbs de Provence, Olive Oil

Collard Greens

And Seasoned Potatoes. I know and I have said it before I am using what our CSA gives us!

ENJOY!!!!

p.s. Have you checked out Make it Paleo yet??? Check out this awesome, colorful, picture-full cookbook! Perfect for any family, Paleo or not!!! Great delicious recipes inside!!!!

Part of : Foodie Wednesday, Real Food Wednesday, Real Food 101, Fat Tuesday

Tuesday, September 6, 2011

Collard Greens

Hubby and I lived in Marietta, Georgia while he attended Chiropractic school. We were there for 4 years and had the privilege of meeting a lot of great friends, many who are life long friends! 

One of those people is a great Southern cook and taught me some of her recipes/tricks for making a few dishes. One of my favorite recipes of hers is her Collard Green recipe. I must add that I had never had Collard Greens until her recipe but since trying hers and loving it, I have started trying it other places... but none are like hers! 

Being in the South and having more people cook Southern foods certain recipe ingredients are easier to find than here in Indiana so I have had to adapt the recipe to fit my ingredient availability!
The Ingredients:
1 or 2 bunches of Collard Greens (I like to make a lot and enjoy them all week!)
1 small onion, diced
1 turkey neck *
water
broth
salt and pepper

* Turkey Necks are really hard to find in Indiana. I have had to switch out the turkey neck for some beef or turkey bacon. Both work great! I also add broth to my water now to help bring out the flavor!

The Directions:
Soak the collard green leaves in cold water for a few hours. This helps give them a good rinse and also starts the process. Taking the center rib out can be done two ways. My friend rips the stem out and then rolls and cuts her pieces. Another way is to just rip the stem out and then rip the pieces. The cutting way leaves the Collards prettier but they all taste the same!!!

I saute the onion and lightly cook the bacon. You don't want to cook the bacon all the way just start the process!

Add all the leaves to a large pot and cover with water. I add broth (whatever kind I have on hand maybe 1 cup sometimes less sometimes more) and the onion and bacon. Boil the collards for a few hours* until they are tender.

* I like to bring my water to a boil and turn the heat down to medium medium high.

These are so good and so amazing!!!! We are enjoying these in our house tonight!!!

ENJOY!!!!

Thursday, September 1, 2011

I will return...

After my family visited a few weekends back my boys and I have been playing catch up.

We are now enjoying beautiful (cloudy!) California, celebrating my mom and my 3 year old (who turns 4 on Saturday!)

I am lots of exciting recipes to post along with some helpful pregnancy tips I have learned 3x around! :) I hope you all have a wonderful LABOR day weekend!!!
p.s. Did you know I labored on labor day 4 years ago!!! It was one of the best days of hard labor I had ever done!!!